MNIST Model
MNIST 本来keras就提供了数据集,直接建好model train就行了
model是我自己随便建的一个标准CNN,相关结构1
2
3
4
5
6
7
8
9
10
11
12
13
14
15
16
17
18
19
20
21
22
23
24
25
26
27
28
29
30
31
32
33
34
35
36
37
38
39
_________________________________________________________________
Layer (type)                 Output Shape              Param #
=================================================================
conv2d_1 (Conv2D)            (None, 28, 28, 32)        320
_________________________________________________________________
activation_1 (Activation)    (None, 28, 28, 32)        0
_________________________________________________________________
max_pooling2d_1 (MaxPooling2 (None, 14, 14, 32)        0
_________________________________________________________________
dropout_1 (Dropout)          (None, 14, 14, 32)        0
_________________________________________________________________
conv2d_2 (Conv2D)            (None, 14, 14, 64)        18496
_________________________________________________________________
activation_2 (Activation)    (None, 14, 14, 64)        0
_________________________________________________________________
max_pooling2d_2 (MaxPooling2 (None, 7, 7, 64)          0
_________________________________________________________________
dropout_2 (Dropout)          (None, 7, 7, 64)          0
_________________________________________________________________
flatten_1 (Flatten)          (None, 3136)              0
_________________________________________________________________
dense_1 (Dense)              (None, 128)               401536
_________________________________________________________________
activation_3 (Activation)    (None, 128)               0
_________________________________________________________________
dropout_3 (Dropout)          (None, 128)               0
_________________________________________________________________
dense_2 (Dense)              (None, 64)                8256
_________________________________________________________________
activation_4 (Activation)    (None, 64)                0
_________________________________________________________________
dropout_4 (Dropout)          (None, 64)                0
_________________________________________________________________
dense_3 (Dense)              (None, 10)                650
=================================================================
Total params: 429,258
Trainable params: 429,258
Non-trainable params: 0
训练code1
2
3
4
5
6
7
8
9
10
11
12
13
14
15
16
17
18
19
20
21
22
23
24
25
26
27
28
29
30
31
32
33
34
35
36
37
38
39
40
41
42
43
44
45
46
47
48
49
50
51
52
53
54
55
56
57
58
59
60
61
62
63
64
65
66
67
68
69
70
71
72
73
74
75
76
77
78
79
80
81
82
83
84
85
86
87
88
89
90
91import numpy as np
from keras.models import Sequential
from keras.layers.core import Dense, Dropout, Activation
from keras.layers import Convolution2D, MaxPooling2D, Flatten, BatchNormalization
from keras.optimizers import SGD, Adam, Adadelta
from keras.utils import np_utils
from keras.datasets import mnist
from keras import initializers, regularizers
from keras.models import load_model
from keras.layers.normalization import BatchNormalization
def load_data():
(x_train, y_train), (x_test, y_test) = mnist.load_data()
number = len(x_train)
x_train = x_train[0:number]
y_train = y_train[0:number]
x_train = x_train.reshape(number, 28, 28, 1)
x_test = x_test.reshape(x_test.shape[0], 28, 28, 1)
x_train = x_train.astype('float32')
x_test = x_test.astype('float32')
y_train = np_utils.to_categorical(y_train, 10)
y_test = np_utils.to_categorical(y_test, 10)
x_train = x_train
x_test = x_test
x_train = x_train / 255
x_test = x_test / 255
#x_test = np.random.normal(x_test)
return (x_train, y_train), (x_test, y_test)
def make_model():
model = Sequential()
model.add(Convolution2D(32, kernel_size=3, strides=1, padding="same", input_shape=(28, 28, 1), kernel_initializer=initializers.he_normal(seed=None)))
#model.add(BatchNormalization(axis=-1))
model.add(Activation("relu"))
model.add(MaxPooling2D(pool_size=(2, 2), strides=2))
model.add(Dropout(0.3))
model.add(Convolution2D(64, kernel_size=3, strides=1, padding="same", kernel_initializer=initializers.he_normal(seed=None)))
#model.add(BatchNormalization(axis=-1))
model.add(Activation("relu"))
model.add(MaxPooling2D(pool_size=(2, 2), strides=2))
model.add(Dropout(0.3))
'''
model.add(Convolution2D(256, kernel_size=3, strides=1, padding="same", kernel_initializer=initializers.he_normal(seed=None)))
model.add(BatchNormalization(axis=-1))
model.add(Activation("relu"))
model.add(MaxPooling2D(pool_size=(2, 2), strides=2))
model.add(Dropout(0.3))
model.add(Convolution2D(512, kernel_size=3, strides=1, padding="same", kernel_initializer=initializers.he_normal(seed=None)))
model.add(BatchNormalization(axis=-1))
model.add(Activation("relu"))
model.add(MaxPooling2D(pool_size=(2, 2), strides=2))
model.add(Dropout(0.4))
'''
model.add(Flatten())
model.add(Dense(128, kernel_initializer=initializers.he_normal(seed=None)))
#model.add(BatchNormalization(axis=-1))
model.add(Activation("relu"))
model.add(Dropout(0.5))
model.add(Dense(64, kernel_initializer=initializers.he_normal(seed=None)))
#model.add(BatchNormalization(axis=-1))
model.add(Activation("relu"))
model.add(Dropout(0.5))
model.add(Dense(units = 10, activation='softmax'))
#model.compile(loss='categorical_crossentropy', optimizer=SGD(lr=0.1), metrics=['accuracy'])
model.compile(loss='categorical_crossentropy', optimizer=Adam(), metrics=['accuracy'])
#model.compile(loss='categorical_crossentropy', optimizer=Adadelta(), metrics=['accuracy'])
model.summary()
return model
def train(model, x_train, y_train, x_test, y_test):
model.fit(x_train, y_train, batch_size=100, epochs=10, verbose=1, validation_data=(x_test, y_test))
model.save('my_model.h5')
result = model.evaluate(x_train, y_train, batch_size=100)
print('\nTrain Acc:', result[1])
result = model.evaluate(x_test, y_test, batch_size=100)
print('\nVal Acc:', result[1])
def main():
(x_train, y_train), (x_test, y_test) = load_data()
model = make_model()
train(model, x_train, y_train, x_test, y_test)
if __name__ == '__main__':
main()
训练结果1
2
3
4
5
6
7
8
9
10
11
12
13
14
15
16
17
18
19
20
21
22
23
24
25
26Epoch 1/10
60000/60000 [==============================] - 44s 731us/step - loss: 0.8629 - acc: 0.7166 - val_loss: 0.1141 - val_acc: 0.9665
Epoch 2/10
60000/60000 [==============================] - 42s 705us/step - loss: 0.2981 - acc: 0.9172 - val_loss: 0.0784 - val_acc: 0.9760
Epoch 3/10
60000/60000 [==============================] - 44s 730us/step - loss: 0.2155 - acc: 0.9422 - val_loss: 0.0584 - val_acc: 0.9823
Epoch 4/10
60000/60000 [==============================] - 44s 733us/step - loss: 0.1742 - acc: 0.9541 - val_loss: 0.0459 - val_acc: 0.9872
Epoch 5/10
60000/60000 [==============================] - 43s 717us/step - loss: 0.1531 - acc: 0.9597 - val_loss: 0.0407 - val_acc: 0.9886
Epoch 6/10
60000/60000 [==============================] - 43s 719us/step - loss: 0.1364 - acc: 0.9645 - val_loss: 0.0374 - val_acc: 0.9888
Epoch 7/10
60000/60000 [==============================] - 44s 727us/step - loss: 0.1251 - acc: 0.9662 - val_loss: 0.0392 - val_acc: 0.9891
Epoch 8/10
60000/60000 [==============================] - 43s 720us/step - loss: 0.1105 - acc: 0.9702 - val_loss: 0.0338 - val_acc: 0.9897
Epoch 9/10
60000/60000 [==============================] - 47s 790us/step - loss: 0.1047 - acc: 0.9723 - val_loss: 0.0340 - val_acc: 0.9893
Epoch 10/10
60000/60000 [==============================] - 50s 840us/step - loss: 0.1024 - acc: 0.9729 - val_loss: 0.0306 - val_acc: 0.9919
60000/60000 [==============================] - 9s 152us/step
Train Acc: 0.9932833393414815
10000/10000 [==============================] - 2s 183us/step
Val Acc: 0.9919000059366226
提出训练集数据看一下1
2
3
4
5
6
7
8
9
10
11
12
13
14
15
16
17
18
19
20
21
22
23
24
25
26
27
28
29
30
31
32
33
34
35
36import matplotlib.pyplot as plt
import numpy as np
from keras.utils import np_utils
from keras.datasets import mnist
def load_data():
(x_train, y_train), (x_test, y_test) = mnist.load_data()
print('len', len(x_train))
number = 10000
x_train = x_train[0:number]
y_train = y_train[0:number]
x_train = x_train.reshape(number, 28, 28)
x_test = x_test.reshape(x_test.shape[0], 28, 28)
x_train = x_train.astype('float32')
x_test = x_test.astype('float32')
x_train = x_train
x_test = x_test
x_train = x_train / 255
x_test = x_test / 255
return (x_train, y_train), (x_test, y_test)
def show(x_train, y_train):
for i in range(10):
plt.imshow(x_train[i], cmap='gray', interpolation='none')
plt.axis('off')
plt.savefig('pic'+str(i)+'.jpg')
plt.show()
print(i, y_train[i])
def main():
(x_train, y_train), (x_test, y_test) = load_data()
show(x_train, y_train)
if __name__ == '__main__':
main()


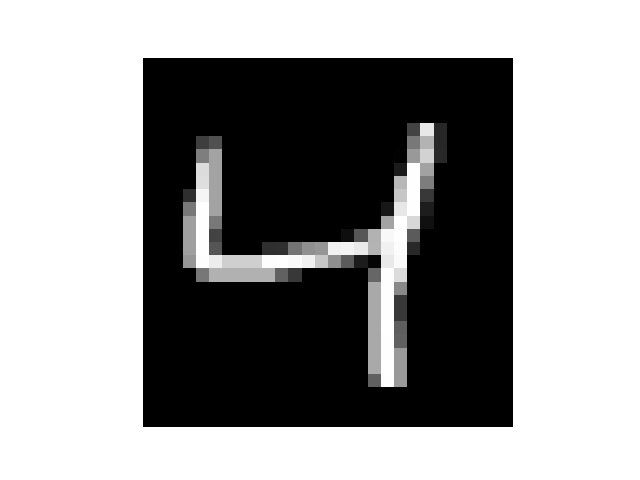


然后我手写了几个数字,但是每个数字都要占满整张图片,所以我把他们分别截成了几张


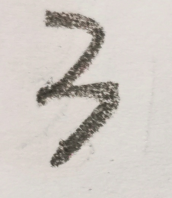

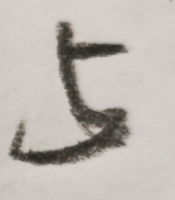


然后处理一下图片
1 | import matplotlib.pyplot as plt |
处理后


识别结果
0,0
1,1
2,2
3,2
4,4
5,5
6,6
7,1
8,8
9,9
有几个错了的说…有可能是因为手写后缩放然后像素不是很平滑?有些毛毛角角的地方
树莓派相关
这是我入手树莓派的第一个项目,顺带着树莓派的系统软件相关了
因为树莓派这么low的配置,所以就不在树莓派上Train了,Model是Train好的,要做的就是移植,然后做些其他啥的
树莓派开发我基本上是在Windows下完成的
烧录系统
装过这么多系统了,这个是最简单的8
相关下载
http://shumeipai.nxez.com/download
我用到的工具有
Win32DiskImager v0.9.zip
PuTTY系统
Raspbian
树莓派官方深度定制的硬件驱动与软件程序,官方推荐系统。如果你第一次使用树莓派,请下载这个。Debian的软件策略偏保守,稳定第一,升级是次要的。
下载链接:http://downloads.raspberrypi.org/raspbian_latest
默认帐号:Username: pi Password: raspberry
具体烧录过程传送门
连接树莓派及配置
因为我没显示器,也没插电脑上是,但是我有多余的网线,一根网线连接树莓派
找ip的命令arp -a.
PuTTY登录树莓派
然后登录以后,先改源 传送门
改完记得update
然后改密码…懒得输那么长 sudo passwd
安装相关软件
这一段不要看了!!!!!!!!!!!!!这是前面悲伤的安装历程,从下一个标题看
vim sudo apt-get install vim(用不惯不会用树莓派自带的vi)
pip3 sudo apt install python3-pip
tensorflow pip3 install tensorflow
然后就遇到问题了…1
2
3
4ERROR: THESE PACKAGES DO NOT MATCH THE HASHES FROM THE REQUIREMENTS FILE. If you have updated the package versions, please update the hashes. Otherwise, examine the package contents carefully; someone may have tampered with them.
tensorflow from https://www.piwheels.org/simple/tensorflow/tensorflow-1.13.1-cp37-none-linux_armv7l.whl#sha256=25f4ff027beec1e568baf8e90a07bad59d354560533d6b37318b9efeb70beeb1:
Expected sha256 25f4ff027beec1e568baf8e90a07bad59d354560533d6b37318b9efeb70beeb1
Got 359f68c6873e43b30e6722e062e984e4d6ec95bd32300ba2e73265accfe1d99f
这好像是由于网络问题造成的..重试了几次,依然是这个结果…
最后我用wget https://github.com/lhelontra/tensorflow-on-arm/releases/download/v1.14.0/tensorflow-1.14.0-cp35-none-linux_armv7l.whl下下来的
各种版本https://github.com/lhelontra/tensorflow-on-arm/releasessudo apt-get remove python3.7.sudo apt-get install python3.5.sudo cp /usr/bin/python3.5 /usr/bin/python3.
这时候再python3试一下,应该就是3.5的版本了sudo apt-get install python3.5-dev
这时候pip3不能用了,要重新装
直接这样重装吧,后面太麻烦了,需要的话加sudo1
2
3
4apt-get remove python-pip python3-pip
wget https://bootstrap.pypa.io/get-pip.py
python get-pip.py
python3 get-pip.py
然后发现python3.7这样是卸不干净的还需要删几个sudo apt-get remove libpython3.7sudo apt-get remove libpython3.7-stdlib
重新安装完了pip3,然后又不能使用了…from pip._internal import mainModuleNotFoundError: No module named 'pip._internal'
然后找到那个文件的地址,把from pip._internal import main改成from pip import main就能运行了
终于搞完了,最后就sudo pip3 install tensor+tab
keras sudo pip3 install keras
这些东西搞了一上午+一中午,我吐了
为什么卸一个Python版本这么麻烦
为什么下载速度这么慢
为什么树莓派的系统自带的是Python3.7
为什么都9102年了,TensorFlow还不支持Python3.7????????
真的吐了,最后import keras还是不成功,numpy的版本有问题pip3 uninstal numpy然后pip3 install numpy==1.14.5
最后总算是整好了…
然后load_model用不了…我吐了..然后自己再搞把版本又搞乱了…重装了
重装
这次重装异常顺利
只需要和以前一样重装系统,烧录,开SSH,然后下面顺序全部执行就好了1
2
3
4
5
6sudo apt install libatlas-base-dev
pip3 install tensorflow
sudo apt-get install libhdf5-serial-dev
sudo pip3 install h5py
sudo apt-get install python3-scipy
sudo pip3 install keras
然后import tensorflow会报几个WARNING,反正是WARNING,不管了233,能用就行了QAQ
语音合成
百度云语音合成Python文档传送门sudo pip3 install baidu-aip 安装
简单的输出调用1
2
3
4
5
6
7
8
9
10
11
12
13
14
15
16
17from aip import AipSpeech
def baiduSpeech(num):
APP_ID = '17149919'
API_KEY = 'A39mzugX82CZx0hBTnHXdIUz'
SECRET_KEY = 'wUrct0zvVeZ9y3ZaeGhz0YfYdsL6Fl47'
client = AipSpeech(APP_ID, API_KEY, SECRET_KEY)
result = client.synthesis(str(num), 'zh', 1, {
'vol': 12,
})
# 识别正确返回语音二进制 错误则返回dict 参照下面错误码
if not isinstance(result, dict):
with open('audio.mp3', 'wb') as f:
f.write(result)
把文件传给树莓派
sudo fdisk -l 查看u盘分区名sudo mount /dev/sda1 /mnt
在树莓派上测试
python3 test.py.1
2
3
4
5
6
7
8
9
10
11
12
13
14
15
16
17
18
19
20
21
22
23
24
25
26
27
28
29
30
31
32
33import numpy as np
from PIL import Image
from keras.models import load_model
x_test = []
for w in range(10):
img = Image.open(str(w)+'.png')
reImg = img.resize((28, 28), Image.ANTIALIAS)
img_arr = np.array(reImg.convert('L'))
threshold = 110
for i in range(28):
for j in range(28):
img_arr[i][j] = 255-img_arr[i][j]
if(img_arr[i][j] < threshold):
img_arr[i][j] = 0
print('1', end='')
else:
img_arr[i][j] = 255
print('0', end='')
print('')
print('')
x_test.append(img_arr)
x_test = np.array(x_test)
x_test = x_test.reshape(x_test.shape[0], 28, 28, 1)
model = load_model('my_model.h5')
y_test = model.predict(x_test)
for i in range(len(y_test)):
print(i, np.argmax(y_test[i]), sep=',')
for i in range(len(y_test)):
print(i, y_test[i])
运行ok,接下来的都是在树莓派上完成的了,主要是摄像头的调用,还有语音的播放
拍摄
先sudo raspi-config在Interfacing Options里把Camera打开raspistill -o new.jpg就可以拍摄保存了
在命令行查看图片的一个方法…虽然很不清晰sudo apt-get install caca-utils 然后 img2txt new.jpg
音频输出
插了个耳机,全是杂音,吵死了
然后我上网找了一下解决办法
…果然大力出奇迹,用力捅到底…
语音播放就用mpv好了sudo apt-get install mpv 然后 mpv audio.mp3就能听到了
整合
把上面零零散散的代码整合在一起就好了,可以完成一个很基本的识别
但是有个问题,就是对图片的要求比较高,因为我控制树莓派拍照实在是太难了…图像处理那一部分也有些问题


就这种清晰度的照片,也识别不出来..
后续再调整吧1
2
3
4
5
6
7
8
9
10
11
12
13
14
15
16
17
18
19
20
21
22
23
24
25
26
27
28
29
30
31
32
33
34
35
36
37
38
39
40
41
42
43
44
45
46
47
48
49
50
51
52
53
54
55
56
57
58
59
60
61
62
63
64
65
66
67import numpy as np
from PIL import Image
from keras.models import load_model
import os
from aip import AipSpeech
def test(w):
x_test = []
img = Image.open(str(w)+'.jpg')
reImg = img.resize((28, 28), Image.ANTIALIAS)
img_arr = np.array(reImg.convert('L'))
threshold = 110
for i in range(28):
for j in range(28):
img_arr[i][j] = 255-img_arr[i][j]
if(img_arr[i][j] < threshold):
img_arr[i][j] = 0
print('1', end='')
else:
img_arr[i][j] = 255
print('0', end='')
print('')
print('')
x_test.append(img_arr)
x_test = np.array(x_test)
x_test = x_test.reshape(x_test.shape[0], 28, 28, 1)
model = load_model('my_model.h5')
y_test = model.predict(x_test)
for i in range(len(y_test)):
print(i, np.argmax(y_test[i]), sep=',')
for i in range(len(y_test)):
print(i, y_test[i])
result = np.argmax(y_test[0])
return result
def baiduSpeech(num, counter):
APP_ID = '17149919'
API_KEY = 'A39mzugX82CZx0hBTnHXdIUz'
SECRET_KEY = 'wUrct0zvVeZ9y3ZaeGhz0YfYdsL6Fl47'
client = AipSpeech(APP_ID, API_KEY, SECRET_KEY)
result = client.synthesis(str(num), 'zh', 1, {
'vol': 12,
})
if not isinstance(result, dict):
with open('audio'+str(counter)+'.mp3', 'wb') as f:
f.write(result)
os.system('mpv audio' + str(counter) + '.mp3')
def main():
s=str(input())
counter = 1
while s!="s":
os.system('raspistill -o '+str(counter) + '.jpg')
res = test(counter)
baiduSpeech(res, counter)
counter += 1
s=str(input())
if __name__ == '__main__':
main()
Reference
- 树莓派实验室(实名感谢该社区233)